A brief introduction to this website
Hello! Welcome to this website where I'm going to write all I know about playing the guitar. Of course, I'm not the best and, in fact, I'm pretty noob, but I needed an idea for this website.
I will be showing images and maybe videos, and this is a very large one-page website, and I will try not to use lorem ipsum (this is going to be pretty time consuming), but I don't promise nothing. Maybe in a copule hours I ran out of ideas and just ude lorem :)
My name is Nahuel Fedyszyn, and this is a page for the Responsive Website Course in freeCodeCamp (I will do whethever I can to get the certifications) and will use this website as practice, not only my coding, but also my english. Let's start!
Introduction to the guitar
So you wanna be a rock supertar, and live large. A big house. Five cars. You're in charge.
Well, maybe not a rock superstar. Guitar hero sounds better (I'm watching you Activision). Before everything, you will need a guitar (one that isn't broken of course), preferably an acoustic or a nylon guitar (spanish style guitars), you can use an electric guitar with no problem, but after a time when you get used to that strings, you will feel that nylon strings or the strings in the acoustic guitar aren't as "weak" as the electric guitar strings, nylon strings and acoustic guitar strings need more presion of your hand and your fingers to get the correct notes.
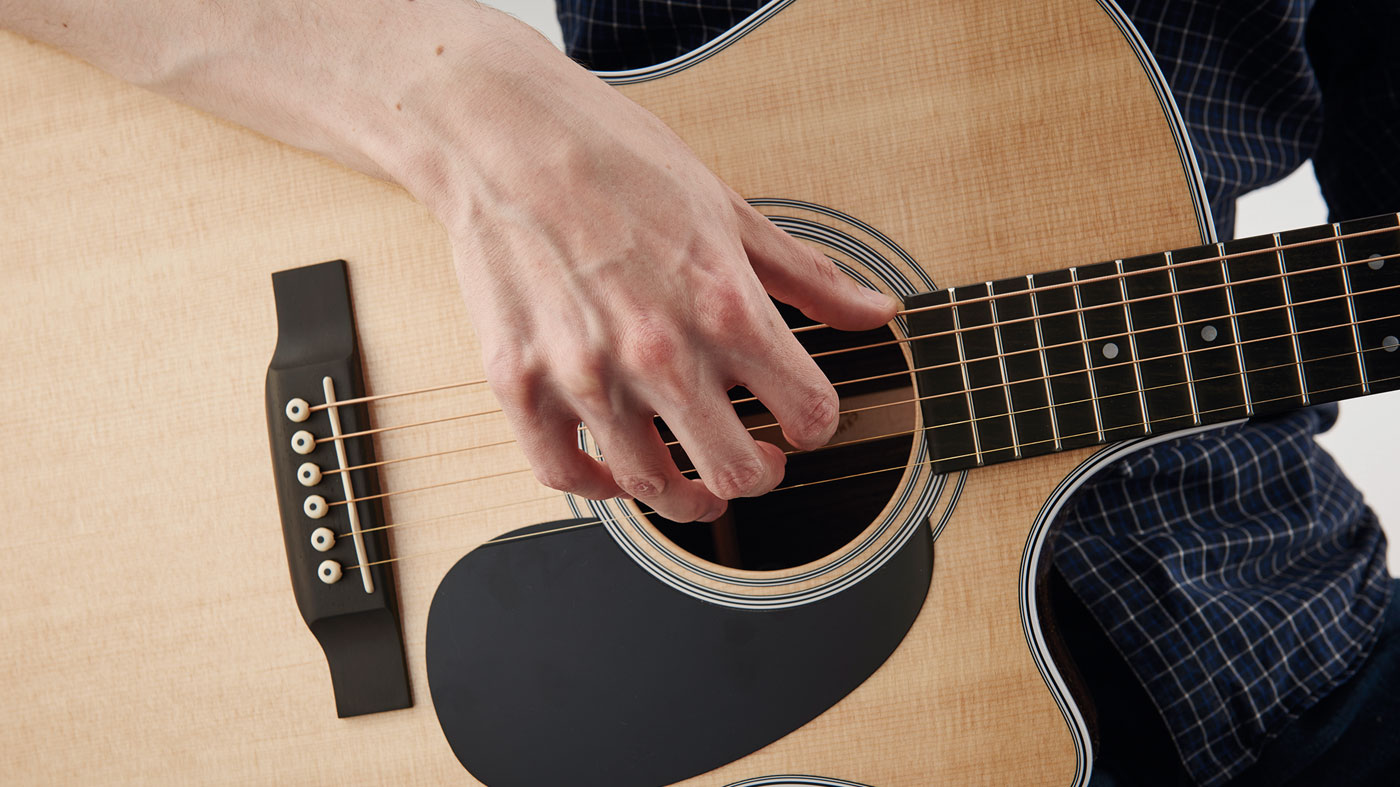
Once you get a guitar, I recommend you to get a chair where you can sit comfortably with your guitar. You can sit like the classical position or in the "casual" position. Personally, I preffer this last one.

|

|
As you can see, this is not only for "looking badass" while playing, the positions will decide how your hands (specially the one in the frets) will move and rest. Again, I recommend the "casual" position, not only because that one is more comfortable for me, but also because when you want to play standing, the position of the guitar is going to be more similar to this one.
There is one more thing before you start playing and making some noise: You must decide if you wanna use a pick or you hand to play the strings.
This is an easy choice, because choosing one doesn't mean you will not know how to play with the other style, but the sounds are very different from one style to another. We will call this styles "fingerstyle" for playing withouth a pick, and "pick style" for playing with a pick (pretty original names). Each style has also his own techniques, pros and cons.
The fingerstyle
If you want to become a fingerstyle master, there is one gold rule: Use all your fingers from your fret hand!
It may sound obvius, but a lot of people is used to play with only two or three fingers in the fret hand (usually the thomb, the index and the middle fingers). In the beggining this fingers, even withouth the middle finger, may look enough, but if you really want to play like the pros, you must start using all your fingers.
The way you use yours fingers should be the thomb for the sixth, fifth and fourth strings, the index finger for the third string, the middle finger for the second string, and the last to fingers for the first string. Of course, this is not mandatory and sometimes you will be using your index fingers to reach the fourth, fifth and even the sixth string, but this cases are not the majority
The cool thing about fingerstyle is that you can play arpeggios with a lot of control of each string and create beautiful melodies. You can get a full song and imitate the guitar, the bass and the voice with an arpeggio, and the sound is pretty smooth if you play with your fingers. If you keep practicing and mastering this style, you will be able to play all by yourself (you can even hit softly the body of your guitar to add percussion), and you will be leaving mouth-opened all your friends in your parties.
The pick style
If you ever sew a rock band playing a song and you saw the guitarrist, you maybe saw that he played the guitar with two fingers. Two fingers?! Hear me out, there is a little thing beetween his two fingers, more precisely, he was holding a pick beetween his thumb and his index fingers.
The pick is a little plastic or metalic thing, very thin (kinda like the thickness of a credit card) and has some sort of a triangle shape (not exatly like a triangle, but similar). Forget about your fingers position this time, that's for the fingerstyle, we will be using a pick. You will strum all the strings with the pick, from the first to the last one, and the pick is the responsible to play all the strings.
The first advantage is going to be very explicit if you start using a pick: Speed. You can strum a single string much more faster (or at least is more easy to do so) than if you were playing with your fingers. This is actually a technique, called tremolo, and is used in a lot of songs. Other techniques from the pick style are advanced ones, like the sweep picking or the heavy metal favourite, the pinch harmonics. Unfortunately, I'm not as good as you may think in playing pick style, so I won't be covering this last techniques because I can't get them to work in my guitar

The next thing you'll notice is the sound. When playing with a pick, you concentrate all the presion in a single point, so the guitar will sound louder, and also it has a distinguishable sound, like more metalic or "sharp" sound. That's why rock guitar players usually use picks to play the guitar, and mastering this technique will give you a faster way to play the notes, with the benefits of particular techniques.
The disadvantage of using pick (at least for someone who is starting to learn how to play guitar) is that you will not have too much control over each string like you have with the fingerstyle, and sometimes you will be strumming strings that you don't want to touch, specially when playing arpeggios, but that is going to improve with a lot of practice.
Now you are ready to start strumming the strings and play some beautiful songs!
Smoke on the water 24/7
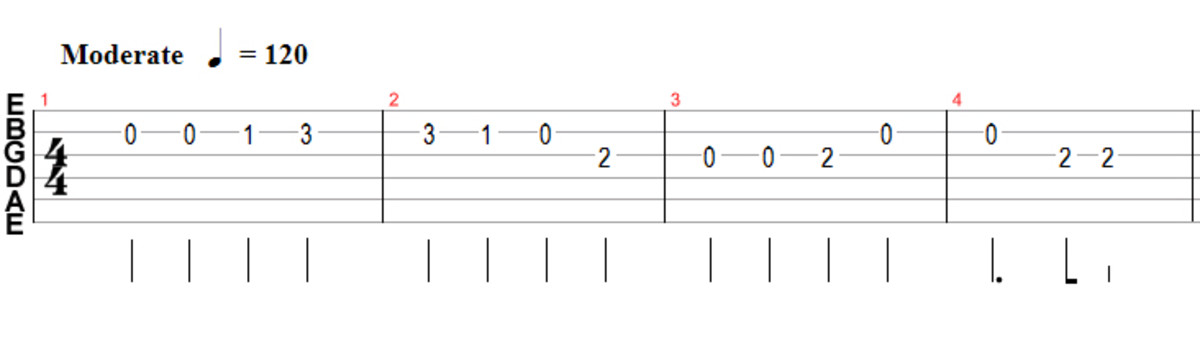
Probably the first riff you will learn, but first thing first. What is a tab?
Did you saw that things the piano players put over the piano and read while they are playing? That thing that looks like papers with black stripes and strange symbols? That is what we call a music sheet (partitura in spanish), and shows how to play a song. A tab has the same objective, but is way easier to read, and will be the start point for you to start playing some real songs.
A tab consists in six horizontal lines, and numbers from left to right over this lines. You guessed it. The lines represents the strings of the guitar, and each number represent a fret from your guitar, and that's it! Is very easy to read, but you must remember the order of the strings. In a tab, the upper line represents the first string of your guitar, the thinnest one, and the last line in the bottom represents the sixth string, the thickest one. So if a see a number three in the sixth line, the tab is telling me that my finger should be pressing the third fret of the sixth string, and if the tab shows me a number zero in the sixth line, the tab is telling me to not press any fret, and simply strum the sixth string.
With this, you can search song tabs in internet, there are plenty of them, from good-to-start tabs, to really expert ones. The most advanced songs put in them some letters in them, we will see them now
Introducing the chords
If you see the last image (the guitar tab) you will notice something:
-
The word "moderate" along a simbol and a 120 relates to the tempo of the song, something that this documentation will not cover
-
The 4/4 numbers represents the compass of the song. Is like the pulse of the song and 4/4 is the most popular one. It means that in a compass are four pulses, and that (usually) carries all over the song
-
The letters
E A D G B Eis what we are looking for. This letters represents the tuning for each string (remember the order of the lines in the tab and which string represents). There are a lot of different tunings (there are even guitars with more than six strings), but the most popular one is the standard tunning, which is/E A D G B E/
Each letter represents a tunning. There are a total of seven tunnings:
Ais called "La", in the standard tunning it represents the fifth stringBis called "Si", in the standard tunning it represents the second stringCis called "Do", but in the standard tunning none of the string is in this tunningDis called "Re", in the standard tunning it represents the fourth stringEis called "Mi", in the standard tunning it represents the first and the sixth stringsFis called "Fa" but in the standard tunning none of the string is in this tunningGis called "Sol", in the standard tunning it represent the third string
Other popular tunning, very used in the heavy metal and the punk rock, is the DropD tunning, in which we take the sixth string, and change the tunning from E to D.
Also, if you down the tune from all your strings, you will get a lower tunes withouth loosing the complete tunning of the guitar. This is useful when you need to play notes that aren't possibles in the standard tunning, because they are too lows.
The "other" letters
In more advanced tabs, you will probably see other letters, which are in the same lines where the numbers are. This letters indicate techniques you'll need to do in that moment to play the song. We will see them now and get some (scary) examples.
-
b: Means bend, and as you may presume, it means that you must bend the string while it is still vibrating (producing sound). This will make the sound go to a higher tone. More bend, the higher the tone. Too much bend, and you will cut your string, so be careful. You may see something like "2b3", that means that you start the bend in the second fret and you must increase your bend until you reach the tone like you were pressing the 3rd fret. Of course, there are no such things like 0b2 (because you cant do a bend withouth touching the frets) or like 1b19 (because you will cut your string before even reaching that tone). Some tabs represents this with a curved line that goes up from a number, usually aside a number that represents how many tones must the note reach
-
h: Means hammer-on. This technique is done by playing a note and then pressing a fret that is under the current fret we are playing the first note. Similar to a bend, this will allow us to play two notes while playing the string only one time. Some tabs represents this technique with a curved line from one number to another (like line doing a bunny hop from one number to another)
p: Means pull-off. Similar to hammer-on, but is the opposite. We nedd to play a note, and release the finger pressing the fret, and voila, we get a lower tone while playing the string once. Some tabs represents this technique the same way has the hammer-on technique
s: Means slide. We want the same, transfer to different frets while playing the string once, but we are too lazy to used more than one finger... Well... The slide is our solution. When doing a slide, whe "slide" our finger from an initial fret to another, transitioning to several notes in one string strum. We can do this to lower or to higher frets. Some tabs represent this like a straight line going up or down from a number to another
x: Means death note (No, I didn't watch the anime), and to do this technique, we simply put our fingers over the strings without pressing them, so we don't play any note if we strum the strings. The song "Smells Like Teen Spirit" from Nirvana is a great example of using death notes to play badass riffs.
Of course, this are not all the techniques, but this are going to be more than enough to take you to a lot of songs.
All of this is currently enough for the test. I'll continue this site eventually